Pre-Trained Models
To help you get started quickly with implementing Dragonfly’s deep learning solutions, you can download a selection of deep models pre-trained by the Dragonfly Team. Starting with a pre-trained model often provides better and faster results with smaller training sets than using an untrained model. In the examples below, the progress of training with a pre-trained and an untrained deep model are shown as a function of increasingly larger training sets — from 2, 4, 8, 16, to 32 labeled patches.
Validation Dice coefficients for pre-trained (in orange) versus untrained (in blue) U-Net dl-5 ifc-64 models using increasingly larger training sets

You should note that the objective when training a neural network is to identify the correct weights for the network by multiple forward and backward iterations. In the case of using pre-trained models for semantic segmentation tasks, you take advantage of learned feature maps to reduce laborious and time-consuming labeling of large training sets.
The following dialog summarizes the differences between default (untrained) models, pre-trained models, and ready-to-use models for semantic segmentation tasks.
Comparison of model types

Pre-trained models can be downloaded directly from the Model Generator dialog from either the Deep Learning Tool or from the Segmentation Wizard.
You should note that models will be downloaded to a local cache the first time that they are generated and copies will then be made for the current session. Subsequent models that are generated will be copied from the local cache. You should also note that Dragonfly will check for new or updated pre-trained models each time that the application is started, provided that your system is connected to the Internet. Cached models will be available even when Dragonfly runs offline.
The local cache is located at: %localappdata%\ORS\Dragonflyxxxx.x\pythonUserExtensions\PythonPluginExtensions\DeepTrainer\PretrainedWeights.
The following pre-trained models are available for download. In most cases, models were trained with subsets extracted from a large repository of diverse greyscale images, with uninformative and duplicate data removed.
| Model | Description |
|---|---|
| Generic U-Net dl-5 ifc-64 | Architecture: U-Net
Parameters: - Depth level: 5 - Initial filter count: 64 Input dimension: 2D |
| Generic U-Net dl-6 ifc-64 | Architecture: U-Net
Parameters: - Depth level: 6 - Initial filter count: 64 Input dimension: 2D |
| Generic U-Net dl-7 ifc-32 | Architecture: U-Net
Parameters: - Depth level: 7 - Initial filter count: 32 Input dimension: 2D |
| Generic Trans U-Net dl-5 ifc-32 | Architecture: Trans U-Net
Parameters: - Patch size: 224 - Depth level: 5 - Initial filter count: 32 - Use batch normalization: True Input dimension: 2D |
| Generic Trans U-Net dl-5 ifc-32 slice-3 | Architecture: Trans U-Net
Parameters: - Patch size: 224 - Depth level: 5 - Initial filter count: 32 - Use batch normalization: True Input dimension: 2.5D, input slices count: 3 |
| Generic Attention U-Net dl-5 ifc-64 | Architecture: Attention U-Net
Parameters: - Depth level: 5 - Initial filter count: 64 Input dimension: 2D |
| Generic INet fc-64 | Architecture: INet
Parameters: - Filter count: 64 Input dimension: 2D |
| Generic U-Net dl-5 ifc-64 slice-3 | Architecture: U-Net
Parameters: - Depth level: 5 - Initial filter count: 64 Input dimension: 2.5D, input slices count: 3 |
| Generic U-Net dl-6 ifc-64 slice-3 | Architecture: U-Net
Parameters: - Depth level: 6 - Initial filter count: 64 Input dimension: 2.5D, input slices count: 3 |
| Generic U-Net dl-7 ifc-32 slice-3 | Architecture: U-Net
Parameters: - Depth level: 7 - Initial filter count: 32 Input dimension: 2.5D, input slices count: 3 |
| Generic Attention U-Net dl-5 ifc-64 slice-3 | Architecture: Attention U-Net
Parameters: - Depth level: 5 - Initial filter count: 64 Input dimension: 2.5D, input slices count: 3 |
| Generic INet fc-64 slice-3 | Architecture: INet
Parameters: - Filter count: 64 Input dimension: 2.5D, input slices count: 3 |
| Generic Sensor3D dl-4 ifc-64 | Architecture: Sensor 3D
Parameters: - Depth level: 4 - Filter count: 64 Input dimension: 3D, input slices count: 3 |
-
Do one of the following:
-
Open the Deep Learning Tool and then click the New button.
-
Open the Segmentation Wizard and then click the Generate New Model(s) button on the Models tab.
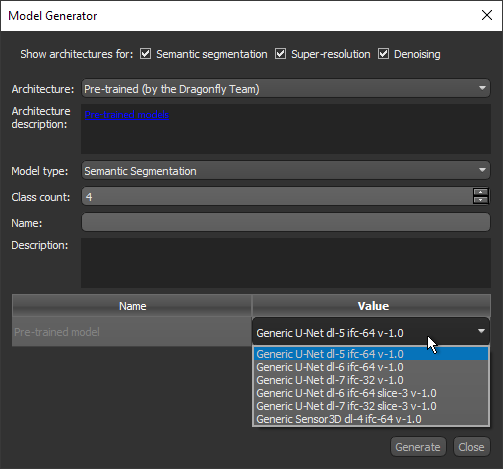
The Model Generator dialog appears.
-
-
Choose Pre-trained (by the Dragonfly Team) as the Architecture.
-
Do the following if you are working with the Deep Learning Tool:
-
Enter a Model type and Class count (for segmentation models only).
-
Enter as a Name and Description for your model, optional.
-
-
Double-click inside the Value cell of the pre-trained model and then choose the required model in the drop-down menu, as shown below.
-
Click the Generate button.
The model will be downloaded to a local cache the first time that it is generated and a copy will then be made for the current session. Subsequent models that are generated will be copied from the local cache.
